Knowing How To Set Timer On Instagram Camera is a great way to capture perfect selfies, group photos, or hands-free videos. Whether you’re looking to step into the frame or just want more control over your shots, using the timer feature is simple. In this guide, we’ll walk you through the steps to set a timer and get the best results every time.
How To Set Timer On Instagram Camera (3 Methods)
Here’s a detailed guide on how to set a timer on the Instagram camera using three different methods
Using Instagram’s Built-in Timer Feature (1st Method)
Instagram recently introduced a timer feature in its camera, perfect for those who want to capture hands-free photos or videos directly within the app.

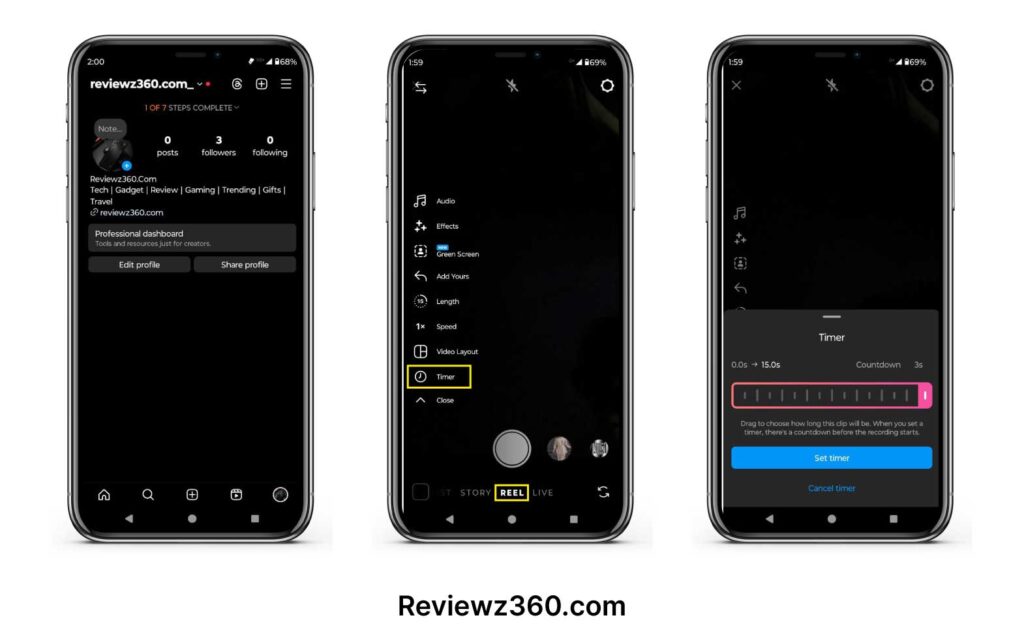
Step 1- Open Instagram and swipe right from your feed to access the camera.
Step 2- Look for the “Timer” icon at the top of the screen. If you don’t see it, make sure your app is updated to the latest version.
Step 3- Tap the “Timer” icon and select the countdown time you prefer (e.g., 3 or 10 seconds).
Step 4- Position your camera, set up your shot, and press the shutter button. The timer will start counting down, giving you time to get into position before the camera captures the photo or video.
Using Your Smartphone’s Built-in Camera Timer (2nd Method)
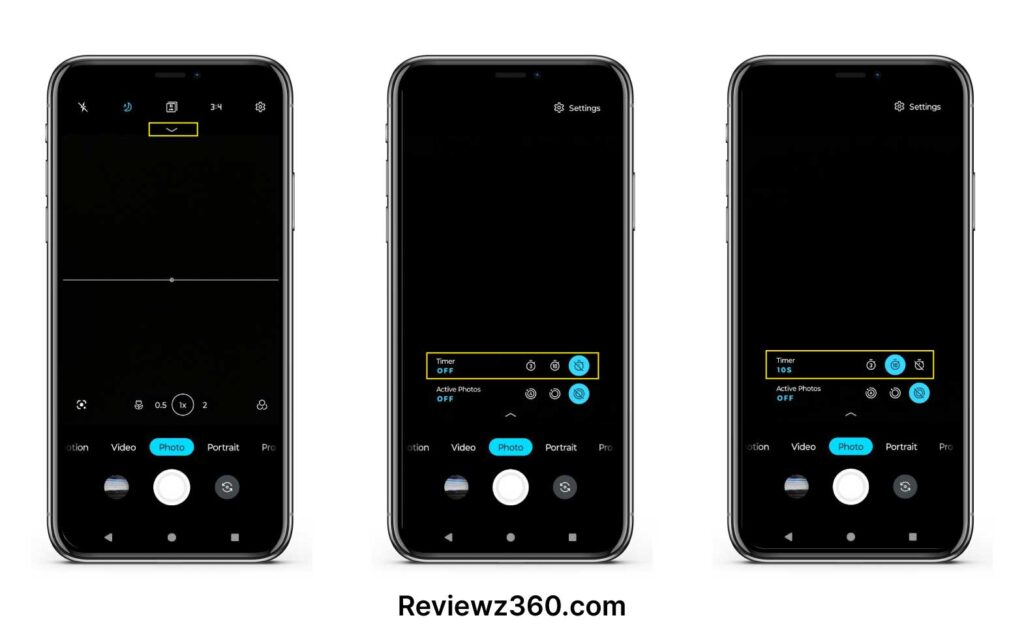
If you don’t see a timer option directly in the Instagram camera, you can use your smartphone’s native camera app to take a timed photo or video, then upload it to Instagram.

Step 1- Open your phone’s camera app.
Step 2- Set the timer by tapping the “Timer” icon, usually located on the top or side menu of the camera interface. Choose a countdown time, such as 3, 5, or 10 seconds.
Step 3- Frame your shot, press the shutter button, and let the timer count down.
Step 4- After capturing your photo or video, go to Instagram and upload it from your gallery or camera roll.
Using Third-Party Camera Apps (3rd Method)
For even more control, you can use a third-party camera app that includes advanced timer features. These apps often offer more customization options for your shots.
Step 1- Download a third-party camera app from the App Store or Google Play that includes a timer feature (e.g., Camera+ for iOS, Open Camera for Android).
Step 2- Open the app and navigate to the timer setting. Select your preferred countdown time.
Step 3- Set up your shot, press the shutter button, and the app will count down before taking the picture or video.
Step 4- Save your photo or video, then open Instagram and upload it from your gallery.
Using these methods, you can easily set a timer to capture the perfect Instagram shot, whether you’re using the app’s native camera, your smartphone’s camera, or a third-party app.
How To Set Timer On Instagram Camera (FAQs)
Yes, Instagram has a built-in timer feature that allows you to set a countdown before capturing a photo or video. This is available in the camera section of the app.
If you don’t see the timer icon, ensure your Instagram app is updated to the latest version. If the timer still isn’t visible, consider using your smartphone’s camera timer or a third-party app.
Yes, you can use your phone’s built-in camera timer to take photos or videos. After capturing your shot, upload it to Instagram from your gallery or camera roll.
Yes, the timer feature can be used for Instagram stories, reels, and regular posts. It’s a great way to capture content hands-free and ensure you have time to get into position.
If you want to cancel the timer after it starts, you can tap the screen or close the camera to stop the countdown and reset the process.

